Bookings with Me integrates with your Outlook calendar and can only be used for 1:1 meetings. Bookings with me is intended for scheduling meeting times with individual users. Bookings is intended for managing scheduling for a group of people, such as scheduling a meeting with one of multiple people who offer the same service.
Setting Up Bookings with Me
Finding a time to meet can be a significant barrier to working closely with students and helping them feel supported. Students, particularly first-year and first-generation students, may be uncomfortable with reaching out to you to schedule an appointment. And recent research has shown that students misinterpret “Office Hours” as the time when you are not to be disturbed, as opposed to the time when you are available for students to drop in. That’s where Microsoft’s Bookings with Me can help!
What is Bookings With Me?
Bookings with me lets someone schedule a meeting or appointment with you through a personal scheduling page. You can use it for office hours so that each student has a dedicated window to meet with you, for times when a student needs to meet outside of your typical office hours, or for scheduling individual conferences with your students.
Bookings integrates with the schedule that is already on your Outlook calendar, so it knows when you are already busy. You can also set specific times when you are available for scheduling (important for maintaining your own boundaries and work/life balance!). You can set up multiple types of meetings, including in-person or online via Teams. You both get an email confirmation and the meeting is scheduled on both of your Outlook calendars. Attendees can update or cancel scheduled meetings with you from your Bookings with me page.
Access Your Personal Booking Page
There are multiple pathways to access the My Bookings Page
- Go to book.ms
- Sign in to your NIU account (use the A-ID@mail.niu.edu format)
- Click Go to my booking page
OR
- Go to O365.niu.edu (or click the Office 365 quick link at the top of any NIU web page)
- Sign in to your NIU account (use the A-ID@mail.niu.edu format)
- In the left toolbar, click Outlook
- Once Outlook loads, in the left toolbar, click Calendar
- On the left side of the screen, click Go to my booking page
You can also access Bookings directly in O365 by using the App Launcher (the icon with nine dots in the upper left of the window) and clicking Explore all your apps. As you continue to use Bookings over time, Microsoft will add it to your frequently used applications in the left toolbar.
Create a Bookings Link
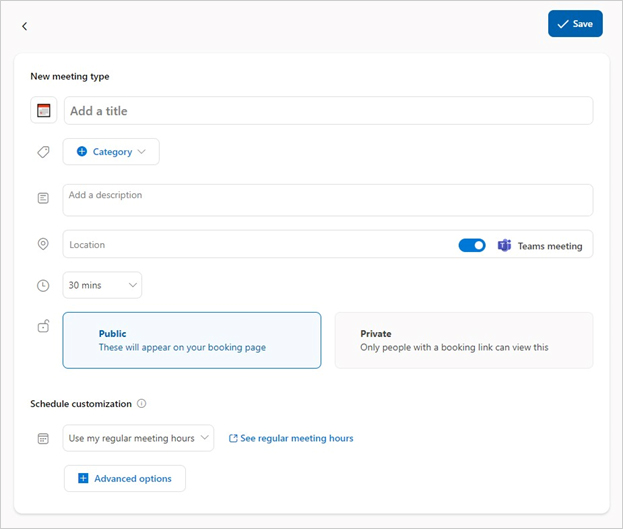
You can create multiple public and private booking request links. You can name the booking (e.g., UNIV 101 Office Hours), set available times (e.g., Tuesdays from 2-4 PM), add a description (e.g., Schedule a time to meet with me during office hours for UNIV 101), and generate sharable links.
- To create a booking, click + next to private or public
- Private – Only people with a direct link can view and book (great for creating separate booking links for different courses or purposes)
- Public – Will appear on your bookings page for anyone to book

- Add a title and brief description
- Select a category (optional) - the categories match those that you use on your Outlook calendar
- Choose a location
- For in-person meetings, enter a room number and toggle Teams meeting off
- For online meetings, toggle Teams meeting on (see the instructions in the FAQ below for using Zoom with Bookings with Me)
- Choose a Duration from the drop down menu - note that all meetings booked using this booking type will have the same duration
- To add a bookings link in your email signature, click Append your personal booking page in your email signature
- Under Schedule Customization, choose Use custom availability hours or Use my regular meeting hours
- Click Advanced options if you would like to add buffer time before or after meetings, limit start time intervals, or set minimum lead time
- When finished, click Save
Share Your Booking Page
You can share your public Bookings with Me page, which allows someone to select any of your public booking types, or you can share a link to a specific booking type (such as if you have different booking types for different courses or different purposes). You can then share that link via an email or in your Blackboard course.
Share a Link to Your Public Booking Page
- From your Bookings with Me page, click the Share menu to the right
- Click Copy link in the menu
Share a Link to an Individual Booking Type
- From your Bookings with Me page, click the ellipses (...) next to an individual booking
- Click Copy link in the menu
Create a go.niu.edu Short URL for your Booking Link
If you plan to reuse the same booking link multiple times, such as for your public booking page, you can request a shortened URL that is easier to share. These have to be reviewed and approved by the NIU Web Team, so they are not available instantaneously.
- Go to go.niu.edu
- Log in with your A-ID (use the a123456 format)
- Paste the URL you copied from Bookings in the Full URL field
- Type what you would like to use as the Shortcut (this is what follows go.niu.edu/). The shortcut has to be distinct but short; consider something like lastname-officehours
- Click the Create Short URL button
It will take 1-2 business days for your short URL to be approved. You will receive an email when it is ready for you to use.
Frequently Asked Questions
Public meeting types can be accessed by anyone that has your Bookings with me page address. You decide who you share your Bookings with me page address with.
Meeting types can be public or private. Public meeting types are available to anyone that you share your Bookings page link with. Private meeting types are only available to people that you share the individual private meeting type with.
Private meeting types can also generate single use links. Single use links expire after their first booking.
No. Anyone or any attendee can schedule time with you using your Bookings with me page, even if they don't have a Microsoft account. That means you can use your Bookings with me page for a variety of purposes, such as scheduling time to meet with prospective students, research subjects, or colleagues at other institutions.
If you want to use Zoom instead of Teams for online meetings scheduled with Bookings with me, you will need a Zoom meeting link to use as the location for the booking type. The easiest approach is to create a recurring Zoom meeting that does not have a fixed time.
To Create a Zoom Link to Use in Bookings with Me
- Log into Zoom at niu-edu.zoom.us using your NIU credentials (use the A-ID@mail.niu.edu format)
- Click the + Schedule a Meeting button
- Change the Topic of the meeting to match your Bookings title
- Click the Recurring meeting checkbox
- In the Recurrence drop down menu, select No Fixed Time
- Set any additional settings that you would like, such as using a waiting room or requiring authentication to join
- Click the Save button
This is likely due to a meeting or appointment that is already on your calendar in Outlook. If you have an item on your calendar that is marked as Busy or Out of Office, Bookings will not allow someone to schedule a meeting with you for the same or an overlapping window.
To fix that, you can either remove the item from your calendar or set it to appear as "Free" to others. Changing the status to "Free" allows you to keep the event without blocking the time from Bookings.
- Right click the event on your calendar
- Click Show As
- Click Free
- Save the meeting/appointment