



The new Gradebook Grid View will be included in the August 6, 2026 update.
New Gradebook Side-by-Side Guide
This guide helps faculty and instructional staff understand what has changed in the new Gradebook Grid View that will become available on August 6, 2026.
- Navigation and Layout
- Search and Filter
- Column Headers & Assessment Details
- Grade Entry & the Grade Details Panel
- Accommodations and Exceptions
- Frequently Asked Questions
- Learn More
Navigation and Layout
| Feature | Current Gradebook [pre-August 6] | New Gradebook Grid View [post August 6] |
|---|---|---|
| Views & tabs |
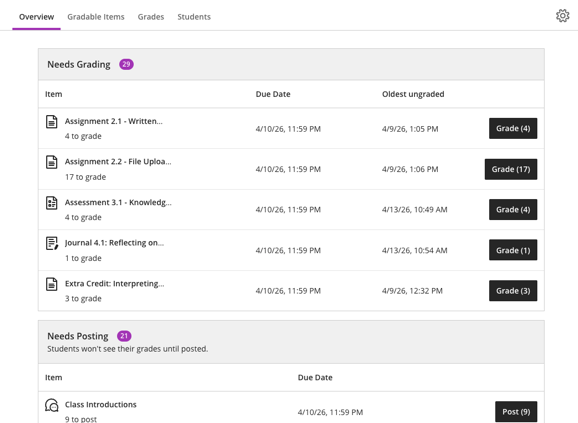
Four tabs: Overview, Gradable Items, Grades, Students
|
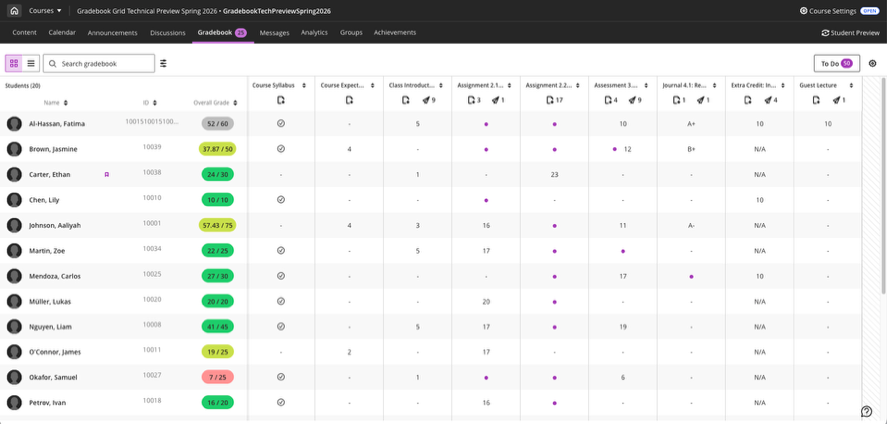
Two views: Grid View and List View, selected via toggle buttons Students tab is removed from Grid View; click a student's name in Grid View to see details
|
| To Do / Overview |
Overview tab - opens a full-page view, losing Gradebook context Shows items for Needs Grading and Needs Posting with quick access to workflows
|
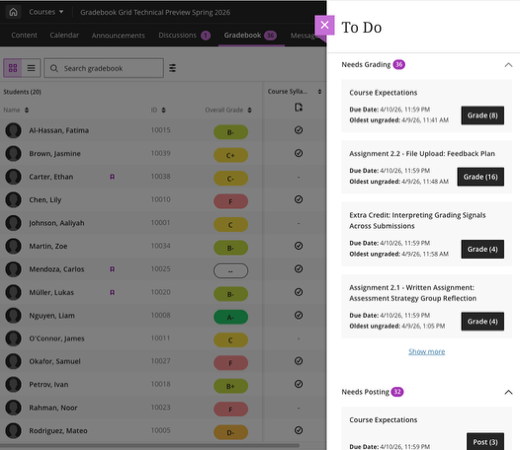
To Do button persistently visible in top right of Gradebook; opens as a panel over the Gradebook Shows items for Needs Grading and Needs Posting with quick access to workflows; sections can be collapsed
|
| Rows |
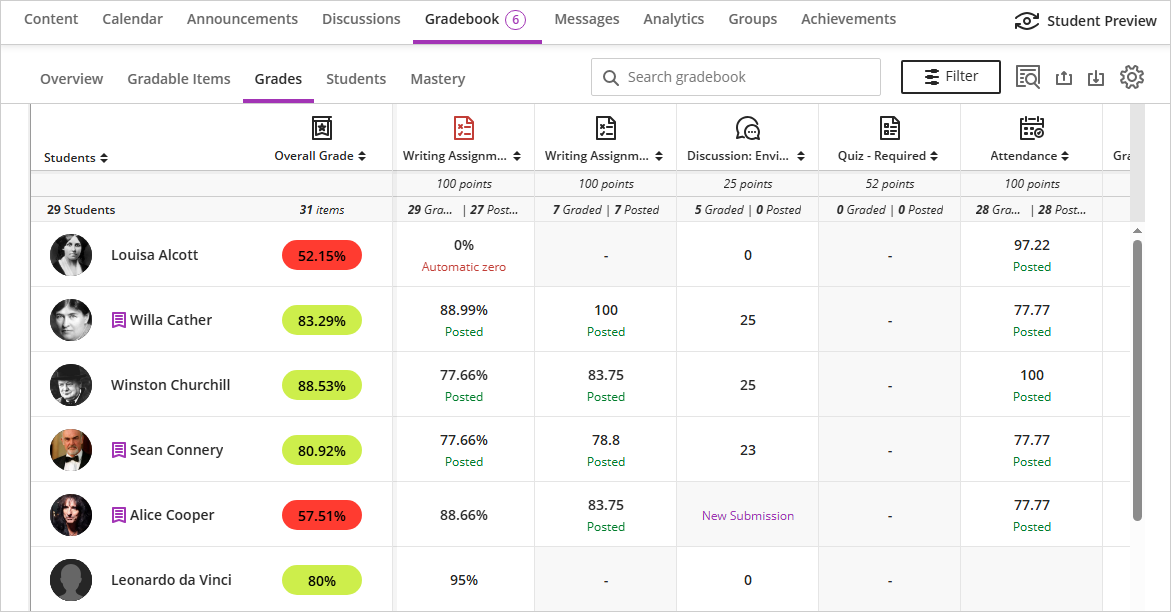
Taller rows, fewer students visible on screen Checkerboard shading, unclear meaning, and visual clutter from status messages
|
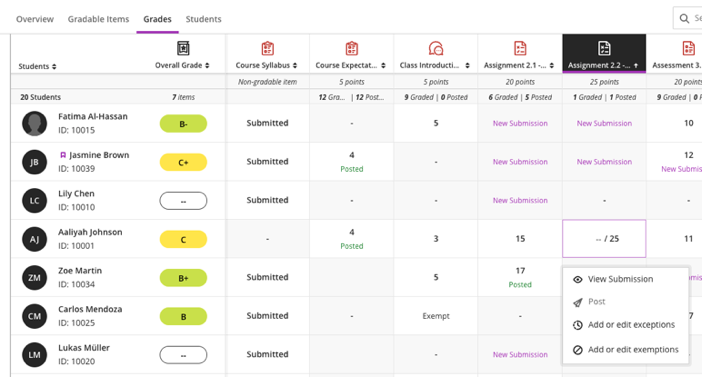
Optimized row height — more students visible without scrolling Striped rows improve readability, and visual clutter minimized with scores, empty cells, and needs grading icons only
|
| Student Names | Names always displayed as First Name - Last Name. |
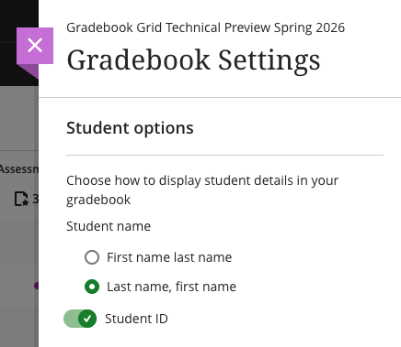
Choose First Name - Last Name or Last Name, First Name in the Gradebook Settings. Enable Student ID column to view it as a separate sortable column.
|
Search and Filter
| Feature | Current Gradebook [pre-August 6] | New Gradebook Grid View [post August 6] |
|---|---|---|
| Search |
Search field on the right in Grades view searches student names, assessment names, and categories.
|
Search field on the left searches student names, assessment names, categories, and submission receipts.
|
| Filter |
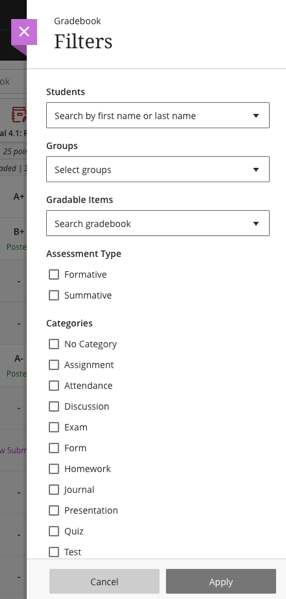
Filter opens in a side panel, and you must click back to the list to select each item individually.
|
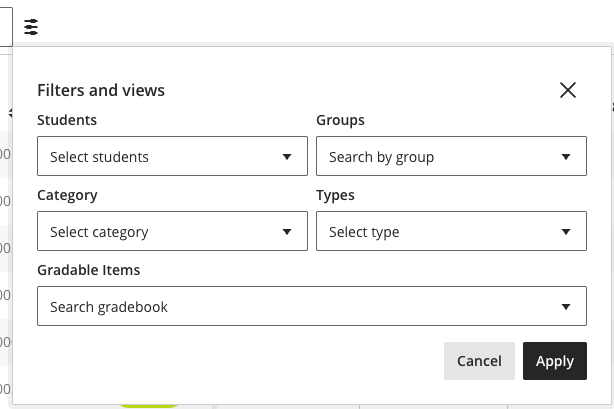
New filtering has the same options (students, groups, category, types, and items), but in a modal that stays open to allow for easier multi-select.
|
| Submission Receipts | Two separate searches: gradebook search + submission receipt search (opens in a panel) | Single unified search bar combining both functions |
Column Headers & Assessment Details
| Feature | Current Gradebook [pre-August 6] | New Gradebook Grid View [post August 6] |
|---|---|---|
| Assessment Details |
Clicking the column header opens a drop down menu. Each action goes to a separate page, creating a ping-pong effect.
|
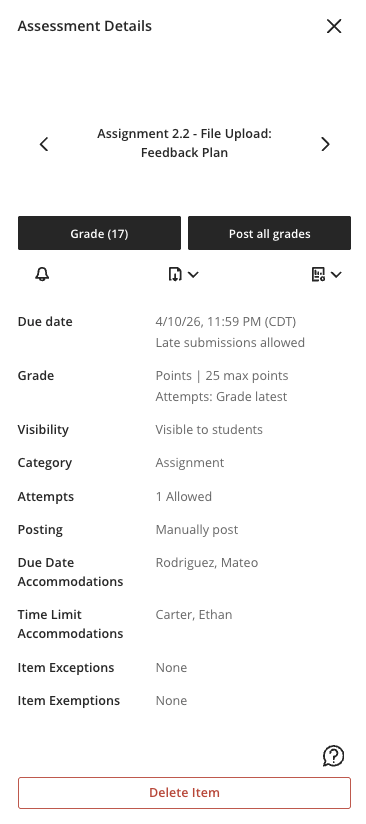
Clicking the column header opens the Assessment Details panel, which stays open until closed. Take multiple actions from the same panel. Click the name to access the Content, Settings, Submissions, and Student Activity tabs. Use the arrows to navigate between columns.
|
| What Displays |
Assessment name only; open the assessment settings to view details |
Full assessment details visible, including due date, points possible, category, grading method, number of attempts permitted, time limit, exceptions, and accommodations |
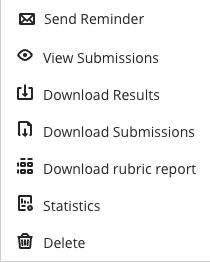
| Actions Available | View submissions, download results, view statistics, send reminder - each opened separately | Same actions, all available from the panel without losing context. Actions only visible if they are applicable to that item.
|
| Delete Column |
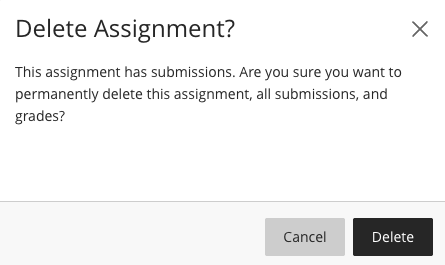
Delete is the last option in the menu; easy to click accidentally. Minimal confirmation warning to prevent accidental deletion.
|
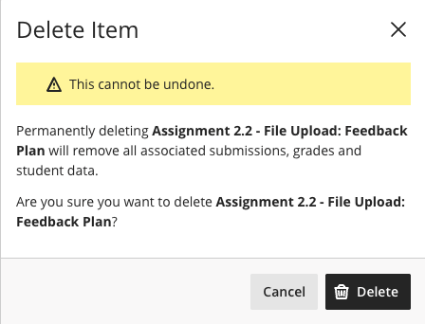
Delete moved further down the panel and displayed as a red button to distinguish it from other settings. Warning pop-up clearly shows the name of the item to be deleted and a caution banner. Harder to delete a column or assessment accidentally.
|
Grade Entry & the Grade Details Panel
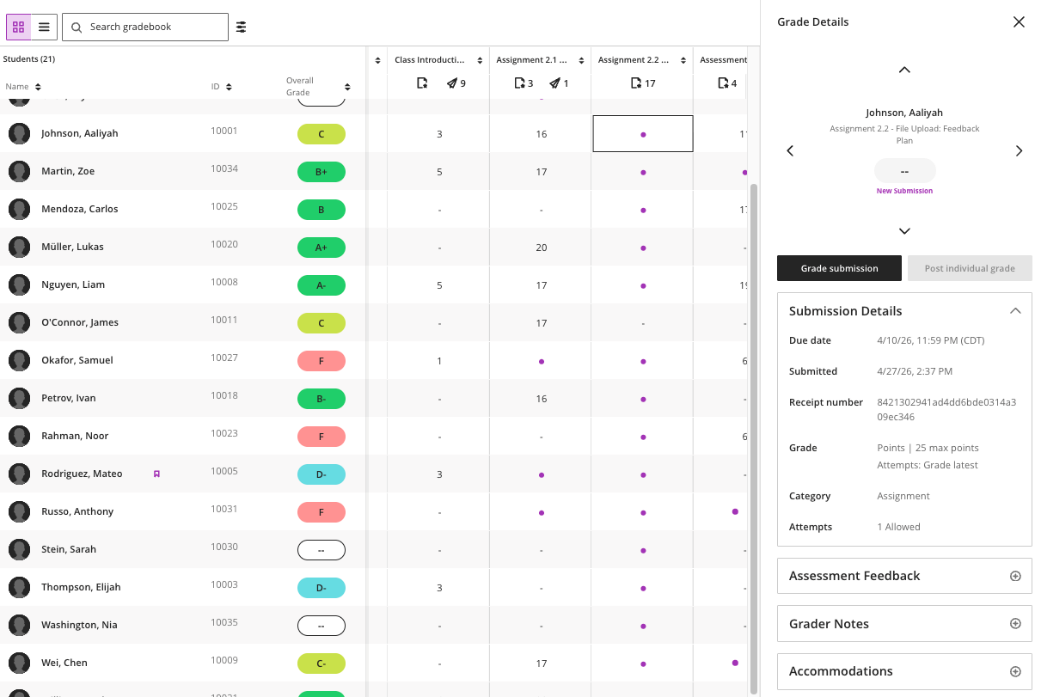
The Grade Details panel is one of the most significant additions. When you click on any cell in the gradebook, this panel opens on the right — keeping the grid visible while you work.
| Feature | Current Gradebook [pre-August 6] | New Gradebook Grid View [post August 6] |
|---|---|---|
| Clicking a Cell |
Clicking a cell opens a drop down menu with limited, inconsistent options between cells. Tasks required many clicks.
|
Clicking a cell opens the Grade Details panel, which includes the student's name, the column name, grade posting status, submission details, feedback, grader notes, and accommodation options - all in one place.
|
| Grading or Viewing a Student Submission |
Click the cell and View Submission from the menu. |
Click the cell and Grade or View Submission from the Grade Details panel. |
| Manual or Override Grade Entry |
Click the cell, type the grade, and press Enter. Easy to accidentally modify or override a grade. |
Click the pencil icon at the top of the column to toggle grade entry mode. Type the grade and press Enter to move to the next student. Click the checkmark or press Esc key to close grade entry mode. More difficult to accidentally modify or override a grade. |
| Posting an Individual Grade |
Click the cell, click Post Grade from the menu. Verify grade posted by the green 'Posted' text below each grade in the grid. |
Click the cell and Post individual grade from the Grade Details panel. Verify grade posted in the Grade Details panel. |
| Feedback and Grader Notes |
View submission to open flexible grading interface to add or edit attempt-level feedback. Click the cell and Feedback & Notes from the menu to view overall feedback and Grader Notes.
|
View and edit attempt, overall feedback, and Grader Notes from the Grade Details panel. Feedback is synced between Grade Details panel and Flexible Grading view for a more consistent experience. |
Accommodations and Exceptions
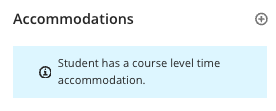
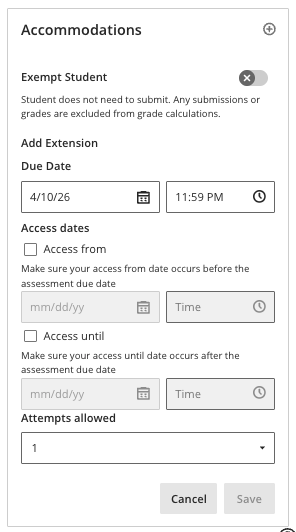
In the new gradebook, Exceptions and Exemptions (assessment-level accommodations) are now grouped under a single Accommodations section in the Grade Details panel. This section also includes a clear indication for students who have a course-level accommodation. The underlying features are the same — only the label has changed to reduce confusion.
| Feature | Current Gradebook [pre-August 6] | New Gradebook Grid View [post August 6] |
|---|---|---|
| Course-level Accommodations | Applied via the Roster or Student Grades page, applied to all relevant assessments. |
No change - Applied via the Roster or Student Grades page, applied to all relevant assessments. Course-level accommodations are now visible in the Grade Details panel so you don't have to switch pages to check.
|
| Exceptions | Add or edit exceptions from the submission list or the Grades View; easy to confuse with Exemptions due to similarity in terminology. |
Exceptions re-named as assessment-level accommodations for consistency and clarity and applied via the Grade Details panel. Two assessment-level accommodations available:
|
| Exemptions | Add or edit exemptions from the submission list or the Grades View; easy to confuse with Exceptions due to similarity in terminology. |
Apply an exemption from the Grade Details panel alongside other assessment-level accommodations. Exempt displays in the grade cell to indicate the exemption is applied. |
Frequently Asked Questions
2026 New Gradebook Update
No. Your grades, grade calculations, and overall grade configuration are untouched. Only the visual interface of the Grid View is changing.
The Students tab has been removed. To view a student’s individual details (progress, activity), click the student’s name in the gradebook. This takes you to the same student-level information.
In the new Grid View, the top of each column shows the number of grades that still need to be posted (via the paper airplane icon). To see whether an individual student’s grade is posted, click that student’s cell to open the Grade Details panel; it shows posting status clearly.
To enter edit mode, hover near the top of the column until the purple pencil icon appears and click it, or tab to the icon using your keyboard. The column enters edit mode and you can type grades directly into each cell.
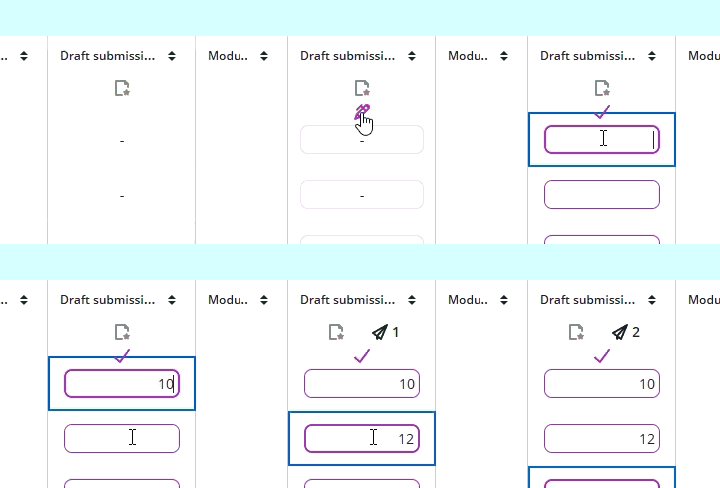
Press Enter to advance to the next student or use the down arrow key. Click the checkmark in the column header or press the Esc key to exit edit mode. Grades will autosave.
Download and upload have moved to the Gradebook Settings panel. Click the settings icon (gear) in the top right of the gradebook to access them. The functionality is the same; only the location has changed.
They’re still there, just reorganized. In the new Gradebook, exceptions (due date changes, access date changes, additional attempts) and exemptions are all accessible from the Grade Details panel under a section called Accommodations. Click any student cell to open the panel. There are no changes to how course-level accommodations are set.
New in this release: if a student has a course-level accommodation, the details are now displayed directly in the Grade Details panel, so you no longer have to navigate away to check.
A purple dot in a student’s cell indicates there is a new, ungraded submission. You can click the dot or the cell to open the Grade Details panel and then navigate to the submission from there. The number at the top of the column shows how many items need grading for that assessment.
For group submissions, you may notice more purple dots in the grid than the number shown in the column header. This is expected — each student in a group shows their own dot, while the column header counts the number of groups that need grading.
Yes. The List View (Gradable Items) is unchanged. You can toggle between Grid View and List View at any time using the buttons at the top of the gradebook.
General Gradebook
In Ultra Course View, you can calculate the Overall Grade based on Points, a Weighted calculation, or an Advanced custom calculation.
To calculate your Overall Grade via Points, click the Overall Grade column and select the Points tab. Ensure that all of the items to be included in the calculation are listed and that the Points total at the bottom of the page is accurate.
You can exclude items from the calculation by clicking the No icon (a circle with a slash). You can also add calculation rules to a category to drop the lowest grade(s) from a category. Other than for calculation rules, Categories have no influence on Points calculations.
To drop grades in a grade calculation, you must be using categories for your calculation. To drop a grade from a category, click the Edit calculation rules link next to the category name. In the side panel, you can specify the number of grades you would like to remove from the calculation, and whether you want to remove the highest or lowest grades. The most common application is to remove a specified number of lowest grades.
Learn more about calculating overall grades.
Downloading grades allows you to save a copy for offline access or to enter grades in a spreadsheet that you then import into Blackboard. In some circumstances, this may save you time on entering grades.
- From the Gradebook, open the Settings panel by clicking the gear icon in the upper right.
- Click the Download grades link.
- Choose whether to download the full gradebook or grade history.
- Select All items or the checkboxes for the specific items you want to download.
- Select the file type for the downloaded file. Data files are comma-delimited (CSV) or tab-delimited (XLS). Both can be opened with Microsoft Excel.
- Select the location for the download. You can save the file to your device or select a folder in the Content Collection.
- Click Download
You can upload a grade file you worked on offline and update your gradebook.
- In the Gradebook, open the Settings panel by clicking the gear icon in the upper right.
- Click the Upload gradebook link.
- Find the correct file and wait for it to be uploaded.
- Select the columns to be uploaded and click the Upload button.
In the downloaded file, be sure to clear any cells you want to add a new grade to. For example, if "Ready to Post" appears with a grade, remove the text and the grade.
You can drag a file from your computer and drop it in the "hot spot" of the upload panel. You can also browse your files or use one you stored in the Content Collection.
In the panel, you can review the list of columns you changed in the file you want to upload. Clear the checkboxes for any data you want to exclude from the upload.
Tutorials
- Navigation and Layout NEW
- Column Header and Assessment Details Panel NEW
- Grade Details Panel NEW
- Accommodations, Exceptions, and Exemptions NEW
- Manual Grade Entry and Posting Grades NEW
- Filter NEW
- Gradebook in Blackboard Ultra
- Grade Using a Rubric
Quick Guides
See Also...
Get Help
Technical Support and Student Help
Division of IT Service Desk815-753-8100
servicedesk@niu.edu