The new Gradebook Grid View will be included in the August 6, 2026 update.
Gradebook
Use your course's Gradebook page to quickly access its coursework and enrolled students. You can customize the gradebook, create calculations, search submissions, and upload or download grades.
Access the Gradebook
The Gradebook is always accessible from the top navigation of your course. Click the Gradebook tab to open the Gradebook. If you have submissions that need grading, the number to grade appears next to the tab as an indicator. An exclamation point indicates that all submissions are graded, but grades for one or more assessments may need to be posted.

Instructors and students use the same tab but have different views of the Gradebook based on their role.
Gradebook Views
There are three views in the Gradebook. Blackboard will remember and bring you back to the last view that you used.
Overview
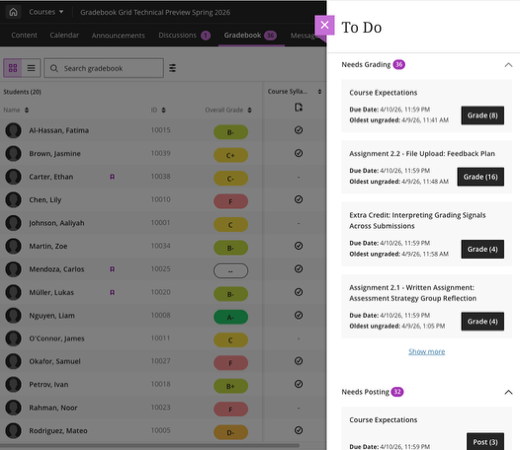
The Overview view was moved to a To Do button that displays at the top right of the Gradebook. Clicking this button opens a panel that displays grading tasks for you to complete:
- Needs grading lists assignments that have submissions ready for grading, allowing you to prioritize grading tasks. Click Grade to open the submissions and begin grading. Peer review assignments are not listed in Needs Grading.
- Needs posting lists graded assessments that are ready to be posted. Click Post to immediately post all grades for that assessment.
- Needs reconciling lists all items that use parallel grading and are ready for reconciliation. Click Reconcile to open the Submissions tab for the item where you can review grades and feedback from others before determining the final grade. NOTE: This section only appears if you are an assigned grader for parallel grading. It's hidden when you have no items for reconciliation.
Gradable Items
The Gradable Items view displays all gradable items in your course. You can view due dates, grading status, and item categories. You can also post grades and adjust the overall grade calculation for the course.
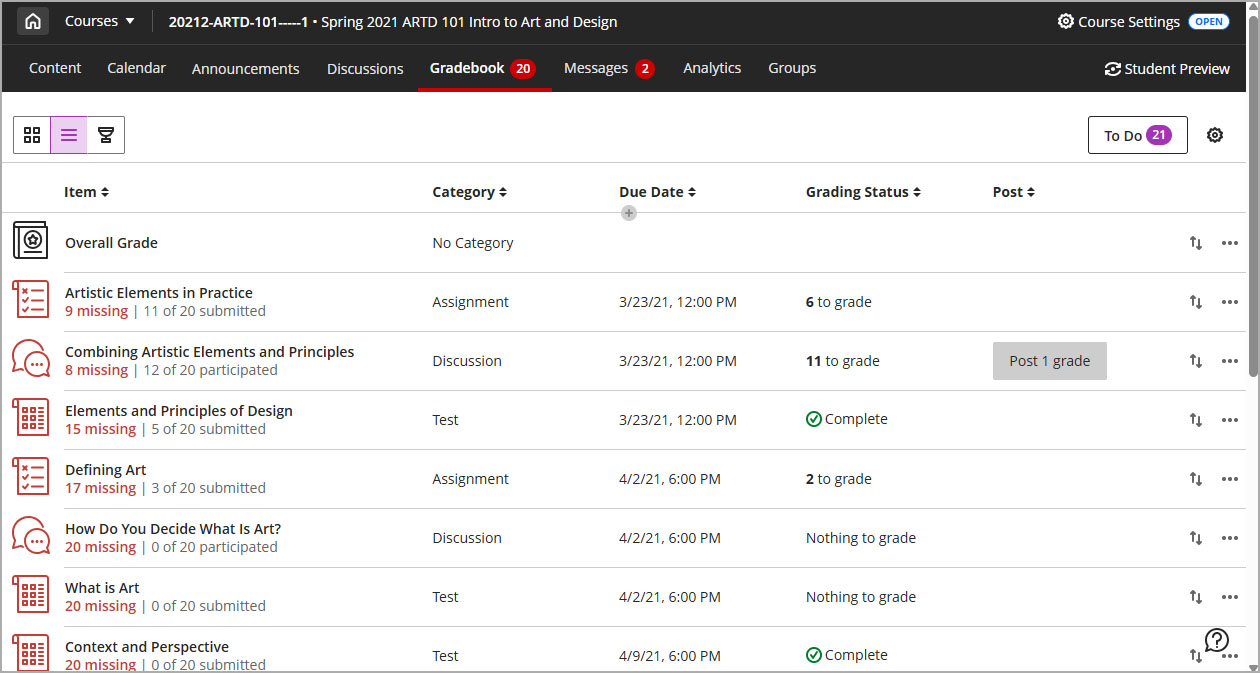
- Click an item’s name to go to its Submissions or Grades & Participation page.
- Click the X to grade message (e.g., 11 to grade) to go directly to the assessments' Submissions page and start grading.
- click the Post X grades to post all of the grades entered for that item and make the grades visible to students.
- Click the ellipsis (...) to edit or delete an item. CAUTION: deleting an item with submissions will also delete the submissions with no way to retrieve them.
- Items with missing submissions past the due date display in red.
- Use the move button (up/down arrows) to drag and drop items in a new order.
Grid
The Grid view displays each student’s grade for a specific assignment, with one student per row and one gradable item per column. Use the arrow buttons at the top of each column to sort into ascending or descending order. Use the Search and Filter options to find exactly the information you need. You can search and filter by student name, group name, gradable item, assessment type, and categories.
On a larger device like a tablet or laptop, use the horizontal scrollbar at the bottom of the Grades table to view more columns. If you have additional columns but do not see the horizontal scrollbar, check your device settings to always show scroll bars.
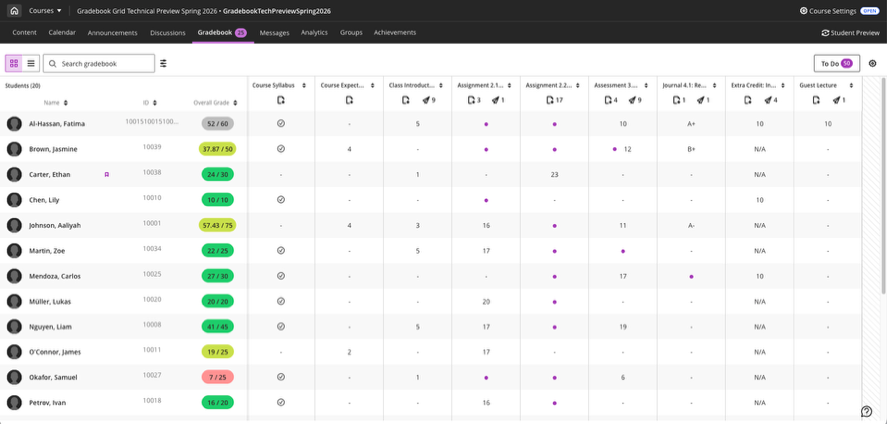
In the grid, you can select a student’s gradable item (i.e., click in one of the cells) to open the Grade Details panel, which allows you to:
- View submission — Go directly to the assignment submission and start grading.
- Post individual grade — Post a grade that’s been assigned but not yet posted.
- Submission Details — View key information, such as the Due Date, the date and time of the student submission, the category, and the number of attempts allowed
- Assessment Feedback — Review and enter feedback for the assessment.
- Grader Notes — Review and enter notes that are private to those with the instructor role.
- Accommodations — View course-level accommodations that apply to this assessment and add additional accommodations specific to this assessment, such as exemptions (no longer counts towards the student's overall grade), extensions (modify the due date or availability dates), or additional attempts.
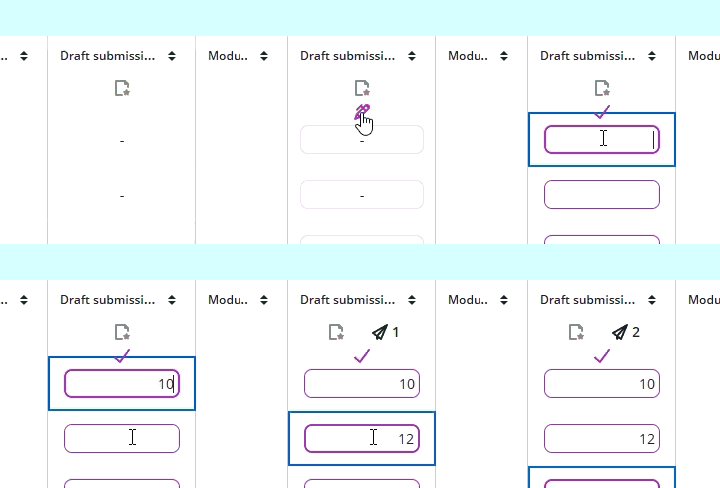
Activate grade entry by clicking the purple pencil icon at the top of the column. Type a grade and press Enter to move to the next student.
When you click a column header for a gradable item, the Assessment Details panel opens with key details including due date, category, max points, grading method, attempts allowed, and any exceptions or accommodations. This panel also includes buttons to begin grading submissions to that assessment, to post all grades entered for that assessment, or send a reminder. Additional options including Question Analysis, Statistics, Download Results, Download Submissions, and download a rubric report are available based on the type of gradable item and whether students have made submissions. Click the name to access the assessment content and settings, and use the arrows to navigate to a different assessment.
Mastery
The Mastery tab in the Gradebook allows you to review how students' course activities and performance align with any Goals you have associated with your assessments. You must have added goals to one or more assessments in your course for this tab to be populated.
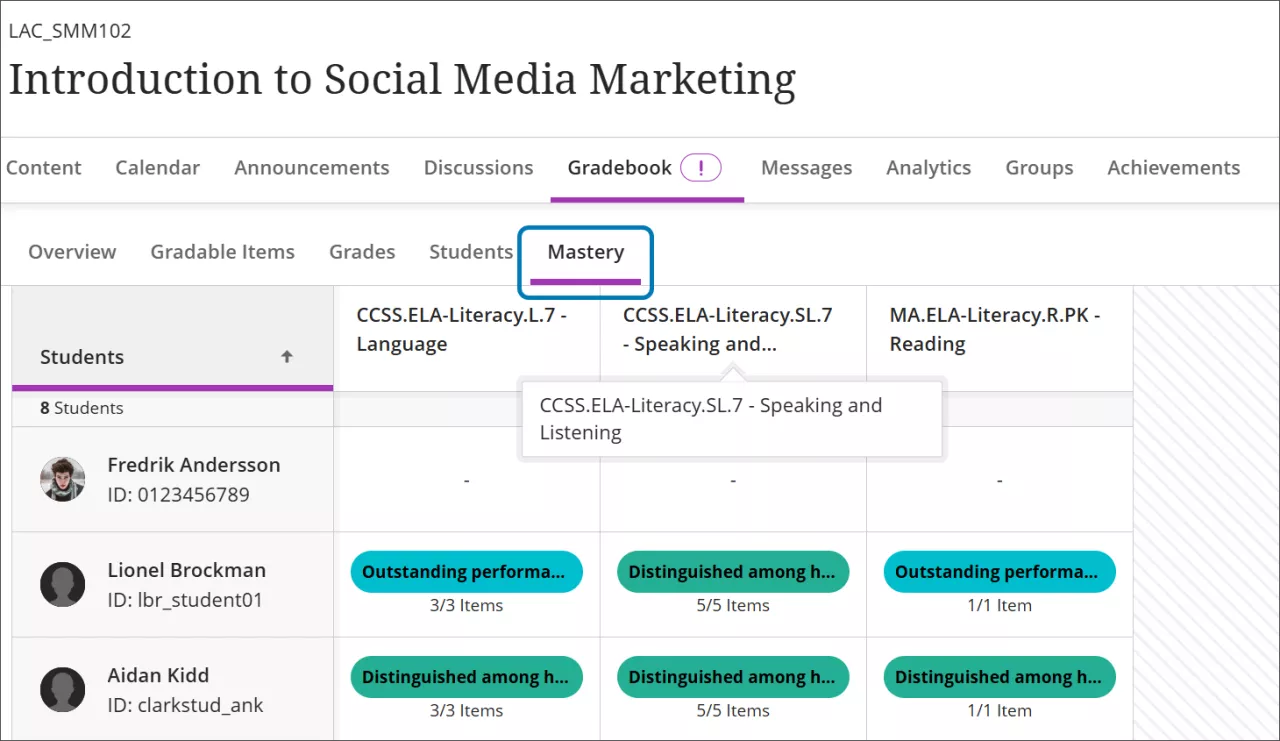
Because this feature is not used in most courses, the Mastery tab is disabled by default. You can enable it in the Course Settings at the upper right corner of your course. Once enabled, you can also determine whether it is visible to students.
Gradebook Settings
You can use Gradebook Settings to customize your Gradebook to match your teaching style and course goals. Click the Gear icon on any view of the Gradebook to open the Settings panel.
Key settings:
- Student Options - choose how to display student details in your gradebook
- Upload and Download Gradebook - export Gradebook as an Excel spreadsheet for offline use or to import student grades from Excel
- Grade Schemas - map percentage grades to letter grades or another notation for reporting performance
- Student Performance - set thresholds for alerts that appear on your Activity Stream
- Automatic Zeros - you can choose to automatically assign zeros to all missing assessment submissions after the due date (automatic zeros are posted immediately)
- Item Management - configure column visibility for yourself and other non-student users (student visibility controlled by the item visibility); bulk-edit categories assigned to assessments
- Grade Categories - add custom categories that you can use to group similar coursework for the purposes of weighted grading calculations
- Course Rubrics - create, review, and edit all rubrics used in the course (note that rubrics cannot be edited once they have been used for grading)
Frequently Asked Questions
2026 New Gradebook Update
No. Your grades, grade calculations, and overall grade configuration are untouched. Only the visual interface of the Grid View is changing.
The Students tab has been removed. To view a student’s individual details (progress, activity), click the student’s name in the gradebook. This takes you to the same student-level information.
In the new Grid View, the top of each column shows the number of grades that still need to be posted (via the paper airplane icon). To see whether an individual student’s grade is posted, click that student’s cell to open the Grade Details panel; it shows posting status clearly.
To enter edit mode, hover near the top of the column until the purple pencil icon appears and click it, or tab to the icon using your keyboard. The column enters edit mode and you can type grades directly into each cell.
Press Enter to advance to the next student or use the down arrow key. Click the checkmark in the column header or press the Esc key to exit edit mode. Grades will autosave.
Download and upload have moved to the Gradebook Settings panel. Click the settings icon (gear) in the top right of the gradebook to access them. The functionality is the same; only the location has changed.
They’re still there, just reorganized. In the new Gradebook, exceptions (due date changes, access date changes, additional attempts) and exemptions are all accessible from the Grade Details panel under a section called Accommodations. Click any student cell to open the panel. There are no changes to how course-level accommodations are set.
New in this release: if a student has a course-level accommodation, the details are now displayed directly in the Grade Details panel, so you no longer have to navigate away to check.
A purple dot in a student’s cell indicates there is a new, ungraded submission. You can click the dot or the cell to open the Grade Details panel and then navigate to the submission from there. The number at the top of the column shows how many items need grading for that assessment.
For group submissions, you may notice more purple dots in the grid than the number shown in the column header. This is expected — each student in a group shows their own dot, while the column header counts the number of groups that need grading.
Yes. The List View (Gradable Items) is unchanged. You can toggle between Grid View and List View at any time using the buttons at the top of the gradebook.
General Gradebook
In Ultra Course View, you can calculate the Overall Grade based on Points, a Weighted calculation, or an Advanced custom calculation.
To calculate your Overall Grade via Points, click the Overall Grade column and select the Points tab. Ensure that all of the items to be included in the calculation are listed and that the Points total at the bottom of the page is accurate.
You can exclude items from the calculation by clicking the No icon (a circle with a slash). You can also add calculation rules to a category to drop the lowest grade(s) from a category. Other than for calculation rules, Categories have no influence on Points calculations.
To drop grades in a grade calculation, you must be using categories for your calculation. To drop a grade from a category, click the Edit calculation rules link next to the category name. In the side panel, you can specify the number of grades you would like to remove from the calculation, and whether you want to remove the highest or lowest grades. The most common application is to remove a specified number of lowest grades.
Learn more about calculating overall grades.
Downloading grades allows you to save a copy for offline access or to enter grades in a spreadsheet that you then import into Blackboard. In some circumstances, this may save you time on entering grades.
- From the Gradebook, open the Settings panel by clicking the gear icon in the upper right.
- Click the Download grades link.
- Choose whether to download the full gradebook or grade history.
- Select All items or the checkboxes for the specific items you want to download.
- Select the file type for the downloaded file. Data files are comma-delimited (CSV) or tab-delimited (XLS). Both can be opened with Microsoft Excel.
- Select the location for the download. You can save the file to your device or select a folder in the Content Collection.
- Click Download
You can upload a grade file you worked on offline and update your gradebook.
- In the Gradebook, open the Settings panel by clicking the gear icon in the upper right.
- Click the Upload gradebook link.
- Find the correct file and wait for it to be uploaded.
- Select the columns to be uploaded and click the Upload button.
In the downloaded file, be sure to clear any cells you want to add a new grade to. For example, if "Ready to Post" appears with a grade, remove the text and the grade.
You can drag a file from your computer and drop it in the "hot spot" of the upload panel. You can also browse your files or use one you stored in the Content Collection.
In the panel, you can review the list of columns you changed in the file you want to upload. Clear the checkboxes for any data you want to exclude from the upload.
Learn More
Tutorials
- Navigation and Layout NEW
- Column Header and Assessment Details Panel NEW
- Grade Details Panel NEW
- Accommodations, Exceptions, and Exemptions NEW
- Manual Grade Entry and Posting Grades NEW
- Filter NEW
- Gradebook in Blackboard Ultra
- Grade Using a Rubric
Quick Guides
See Also...
Get Help
Technical Support and Student Help
Division of IT Service Desk815-753-8100
servicedesk@niu.edu