CRCD Help Desk App Intended Usage
Access
There are three ways to run the app:
- Use the app as embedded in the CRCD website
- In the browser (after login to Office 365 account ): just like a regular website at this link:
http://bit.ly/crcdhelpdesk - On your phone:
- download PowerApps from Play Store / App Store
- log in with your NIU credentials
- the CRCD Help Desk App should show up ® tap ellipsis
- Pin to Home ® it looks just like any other app on your phone (you can drag the app icon wherever you want) ® tap to launch
For all options, you will need to accept the permissions only when you launch the app for the first time. If the app has been updated since last use, at launch a message is displayed notifying you of the availability of a new version. Click or tap the message to use the latest version.
Usage
- The system greets the user. Login as user
- Click or tap upper right corner ‘Create new ticket’
- Enter a brief title to start your ticket
- Select a category that best describes the issue that is the subject of the ticket.
Possible choices are: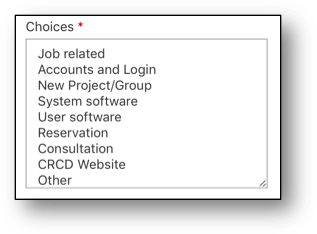
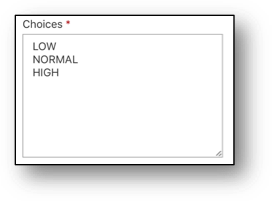
- Select a realistic priority level:
- Enter a succinct description of the issue. Each category is provided with hint text to help the user enter the relevant information.
- Click or tap create.
- On the submission confirmation screen, click or tap the check mark. The new ticket shows up in the user’s ticket list.
All tickets’ current status is associated with one of the following statuses:
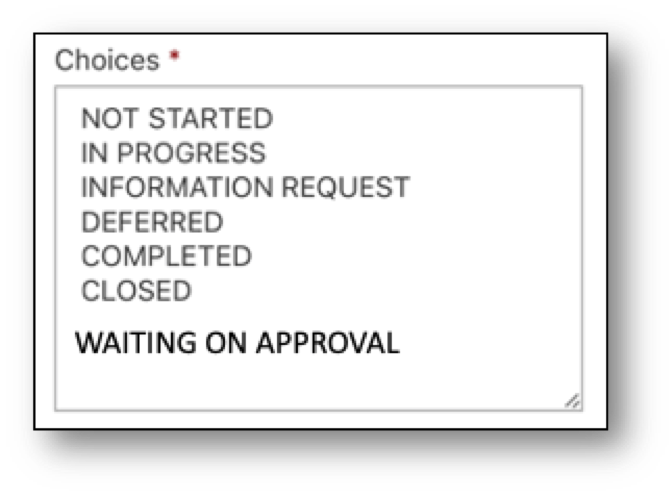
Initially, there are two possibilities: ‘NOT STARTED’ and ‘WAITING ON APPROVAL’. The initial setting depends on the category of the ticket. The categories that require approval will have ‘WAITING ON APPROVAL’. Currently, these categories are ‘New Project/Group’ and ‘Reservation’.
While the status of a ticket is ‘NOT STARTED’, it is possible to update the ticket by the user. Its status will remain the same.
Once the ticket is assigned to CRCD staff, its status will change. The new status will be the best match to each individual case. However, the user will not be able to update the ticket anymore, except for the description in two cases:
- a) Status is set to ‘INFORMATION REQUEST’,
- b) Status is set to ‘COMPLETE’.
Submitted tickets can be deleted, except when their status is ‘COMPLETED’. Deleting open tickets abandons them. A confirmation screen with this warning is displayed to the user.
Other user actions allowed by the app:
- After login the user is shown a history of previously submitted owned tickets. The display is organized into scrollable cards, mimicking most modern app user interfaces. Each card summarizes a ticket’s state. Of course, if no tickets have been submitted in the past, the initial screen will be empty.
- Clicking or tapping anywhere in a ticket brings up a ticket view screen, where all the information regarding that particular ticket is shown.
- Updating tickets by the user, when available, is possible either from the ticket gallery or the single ticket view screen.
- Deleting tickets is possible in the ticket gallery.
- In addition to the obvious navigation icons, there is:
o A toggle on the ticket gallery screen to hide or show tickets with statuses of ‘COMPLETED’ and ‘CLOSED’. The default is to show all tickets.
o An option list on the ticket gallery screen, that brings up options to sort and/or group the tickets by various criteria. Current choices are:
- Sorting in ascending or descending order,
- Sorting by created or by last modified date,
- Group by status,
- Group by priority.
o Defaults are to sort descending by the date created, and no grouping of any kind.
Notifications: users are notified by email instantaneously after every action taken in the app by the user or by an admin (of course only for actions related to that user’s tickets).